After signing up for FundingNotify, there is one setup step you need to complete: a Gmail forwarding rule that takes 2 minutes and is done once — forever.
This guide walks you through the exact steps, from adding the forwarding address to creating the filter. After this, every email from @nait.ca will automatically be forwarded to FundingNotify, which monitors it and calls your phone the moment the funding email arrives.
Why This Setup Is Necessary
FundingNotify works by monitoring the NAIT funding email on your behalf. To do this, it needs to receive a copy of emails that arrive in your Gmail inbox from NAIT.
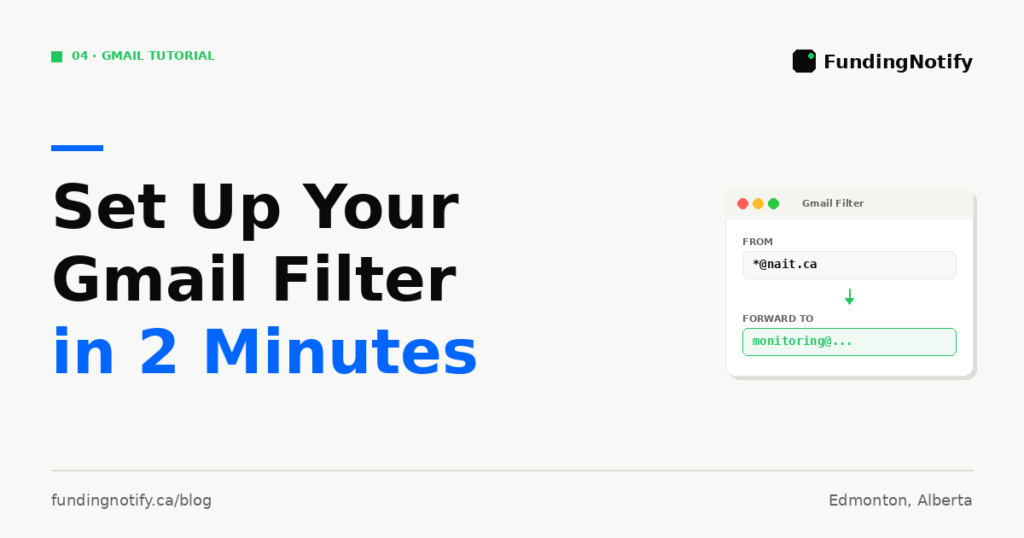
The setup is a Gmail forwarding filter — a rule that tells Gmail: “Whenever I receive an email from @nait.ca, automatically send a copy to monitoring@fundingnotify.ca.”
You set this up once. After that, it runs automatically in the background, forever, without any action required from you.
What You Need Before You Start
- Your Gmail account — the one registered with NAIT
- A desktop or laptop computer (this setup cannot be done from the Gmail mobile app)
- 2 minutes
Step 1 — Add the FundingNotify Forwarding Address to Gmail
Before creating the filter, Gmail requires you to verify the destination address. This is a one-time security step that confirms FundingNotify has agreed to receive your forwarded emails.
1. Open Gmail on your computer and click the gear icon (⚙️) in the top right corner.
2. Click “See all settings”.
3. Click the “Forwarding and POP/IMAP” tab.
4. Under the Forwarding section, click “Add a forwarding address”.
5. In the popup, type exactly:
monitoring@fundingnotify.caThen click Next → Proceed → OK.
6. Gmail will send a verification email to monitoring@fundingnotify.ca. FundingNotify automatically handles this verification on their end. Within a few minutes, return to this page and refresh your browser — the address should now show as verified.
Note: If the address does not appear as verified after a few minutes, refresh the page again. FundingNotify processes verification emails automatically.
Step 2 — Create the Forwarding Filter
Now you create the rule that tells Gmail which emails to forward.
1. In Gmail, click the search bar at the top of the page. Click the Show search options icon (the small triangle or filter icon on the right side of the search bar).
2. A search options panel will appear. In the From field, type exactly:
@nait.caThis tells Gmail to apply this rule to any email sent from any address ending in @nait.ca.
3. Click “Create filter” at the bottom of the panel.
4. A list of actions will appear. Check the box next to:
- ✅ “Forward it to” → select
monitoring@fundingnotify.cafrom the dropdown
5. Click “Create filter” to save.
That is it. The rule is now active.
What Happens After the Setup
From this point forward:
- Every email you receive from any @nait.ca address is automatically forwarded to
monitoring@fundingnotify.ca - FundingNotify monitors these forwarded emails
- When the NAIT Foundational Learning funding email arrives, FundingNotify detects it immediately
- Your phone rings with an alert call
- You receive an SMS with the direct link to the funding application form
- If you do not answer the first call, a second reminder call fires automatically 5 minutes later
You do not need to check your email. You do not need to remember to look for the funding notification. Your phone will ring.
How to Verify the Filter Is Working
To confirm your filter is set up correctly:
1. In Gmail, go to Settings → “Filters and Blocked Addresses” tab.
2. You should see a filter that reads: “Matches: from:(@nait.ca)” → “Forward to: monitoring@fundingnotify.ca“
If you see this filter listed and active, the setup is complete.
Troubleshooting — If the Filter Does Not Appear to Work
The forwarding address shows as “pending” and not verified Return to Settings → Forwarding and POP/IMAP → refresh the page. If it still shows pending after 10 minutes, contact FundingNotify support at contact@fundingnotify.ca.
The filter was created but emails are not being forwarded Check that the forwarding address monitoring@fundingnotify.ca is listed as verified in Settings → Forwarding and POP/IMAP. A filter that forwards to an unverified address will not work.
Gmail says “forwarding not available” Some Google Workspace accounts (school or employer accounts) have forwarding disabled by the account administrator. If you use a personal Gmail account (ending in @gmail.com), this should not apply to you. If you use an institutional Gmail, contact your account administrator.
I set up the filter but I am not sure if it is forwarding correctly Ask a friend to send you a test email from any address. Then check whether FundingNotify received a forwarded copy by contacting support. Alternatively, wait — when the next NAIT email arrives in your inbox, it will be forwarded automatically.
Important Notes
This filter only forwards emails from @nait.ca It does not forward your personal emails, your other subscriptions, or anything unrelated to NAIT. Your Gmail inbox is not shared with FundingNotify — only emails from @nait.ca addresses are forwarded.
Your Gmail security is not affected This is a standard Gmail forwarding rule. Google supports and secures this functionality natively. FundingNotify receives only the forwarded copies of NAIT emails — nothing else from your account.
The setup is done once You do not need to redo this setup each term. Once the filter is active, it runs permanently until you manually delete it.
If you change your Gmail address If you register a new Gmail address with NAIT, you will need to repeat this setup on the new account.
Quick Setup Checklist
- ✅ Open Gmail on a desktop or laptop
- ✅ Go to Settings → Forwarding and POP/IMAP → Add forwarding address:
monitoring@fundingnotify.ca - ✅ Wait for verification (a few minutes) → refresh the page
- ✅ Go to the search bar → Show search options → From:
@nait.ca→ Create filter - ✅ Check “Forward it to” → select
monitoring@fundingnotify.ca→ Create filter - ✅ Verify the filter appears in Settings → Filters and Blocked Addresses
- ✅ Done — your phone will ring when the funding window opens
Not Signed Up for FundingNotify Yet?
If you have not activated your alert yet, go to fundingnotify.ca to sign up. After signup, you will receive a video guide that walks you through this exact setup — including a screen recording of every step.
The funding window lasts approximately 48 hours. All available spots are typically claimed within 6 hours. The setup takes 2 minutes.
👉 Activate your alert at fundingnotify.ca
FundingNotify is not affiliated with NAIT. It is an independent service designed and operated in Edmonton, Alberta.
Last updated: May 2026. Gmail interface details may vary slightly depending on your browser version.
Ne manque plus jamais ton funding NAIT Never miss your NAIT funding again
SMS + appel automatique dès l'ouverture du funding. 30 $ pour toute la session. SMS + automatic call when funding opens. $30 for the entire session.
Activer mon alerte — 30 $ Activate my alert — $30Articles similaires Related articles
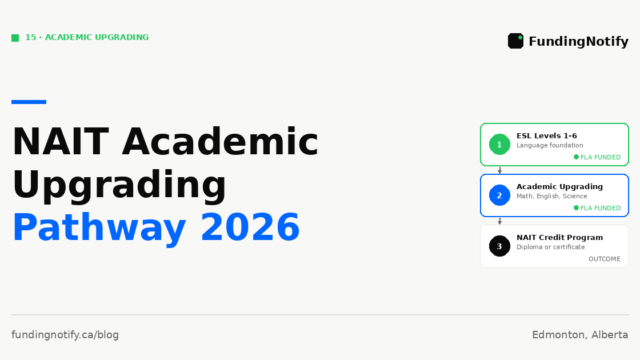
If you did not finish high school, or if your high school grades are not strong enough to enter the NAIT program you want, Academic…
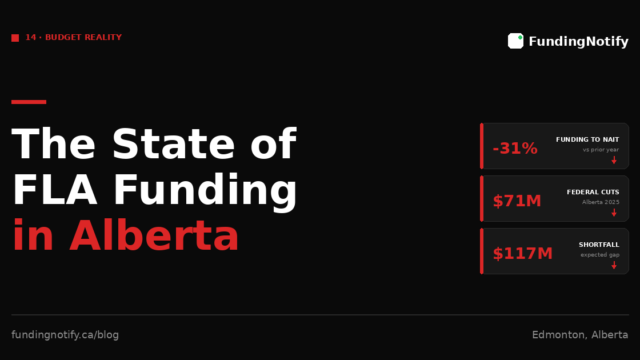
The Foundational Learning Assistance program has existed in Alberta for decades. For most of that time, it was a stable, predictable source of support for…

The numbers around NAIT’s FLA funding — 48 hours, 6 hours, 3 sessions per year — are easy to read but hard to feel. What…